Creating slides in a project
Slides play a major role in creating projects. Creating a project is like working on the slides and differentiating the content by slides. These are called as frames or shots.
Adobe Captivate has included many types of slides for including in a project,
Content slide: It is a basic slide in the captivate project, where you can add content like text captions, interactive objects and Non-interactive objects.
Blank slide: When you open a blank slide, nothing is included as default. You can create the work from scratch.
Question slide: These are the slides where you can add questions, answers and interactive objects.
Knowledge check slide: It is like questions slide. You can create learning activity for learners without any reporting structure and results.
PowerPoint slide: Opening this slide allows you to import the slides from PowerPoint Presentation.
In Adobe Captivate, there is an option for adding Recording Slide. If you wish to record window actions and add it as a slide, you can do it via Video Demo or Software Simulation slide. Let’s see how to record an additional slide to a project.
- Go to the project where you want to add recording slide
- Click Slides and choose Software simulation or Video demo
- After selecting a required choice, a dialog box appears, select the required slide after which you want to add recording slide.
- Recording appears and asks for the window you want to record
- Set the window which you want to record
- Select the required recording options and click Record
The newly recorded slide is added after the slide you selected.
Let’s see how to add Knowledge check slides,
Go to Slides and choose the Knowledge Check Slide.
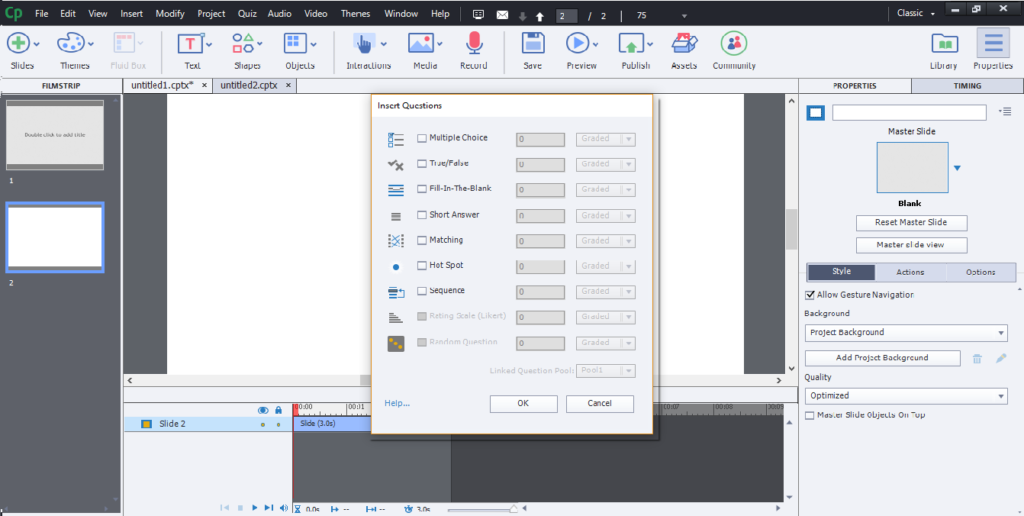
Select the type of question and number of slides you want to add
- Click OK.
- Knowledge Check Slides are added.
- You can edit knowledge check slides such as color, gesture, and gradient.
- Click the Quiz properties to edit the slide
Creating slides in a project
Slide color depends on the Master Slide. You can change the background color of a slide from default to custom color from the master slide. The color set for the master slides is applied to all the slides.
You can change the default color of the slide by following these steps:
- To change the background color of a slide, select the required slide from Filmstrip to be changed
- Go to Property inspector and clear the Project Background checkbox
- Click the Custom
- Select the required color from color palette
- Click on the color to apply.
Editing Slide properties
To jump from one slide to another slide, enter the slide number in the application bar located on the top of Workspace. Slides can also be identified by labels that appear under the slide. Double click on the label name and enter the required text to add as label.
Adding Caption to a slide
- To insert a caption for a slide, open the Slide you want to insert
- Go to Insert > Standard objects > Text Caption
- Text Caption is added to the slide
- You can also change the properties of caption such as color, size, transparency, and font
Background Images for the slide
You can change the default background of the slides to image by following these steps,
- Select the required slides from Filmstrip by holding the Shift or the Ctrl key for selecting multiple slides at a time
- Go to the Property Inspector window and clear the checkboxes for the Use Master slide Background and Use Project Background
- Click the Browse icon.
- A dialog box appears for browsing the images
- Navigate to the location of the image
- Select the Image and click OK
The background image is added. You can edit the background image by clicking the edit under the slide Property Inspector. You can change the attributes of the image.
Group and Ungroup of the slides
If a project contains several slides that are not manageable easily, then you can group some of the slides, and you can manage. By doing this, it is easy for working on a large number of slides. It is also helpful in deleting or hiding the slides at once in an easy way.
Grouping of Slides
To select multiple slides at a time, select the slides by holding the Shift or Ctrl key
- Right-click on the slides and select Group
- Click OK
- Now the selected slides are grouped as one single slide and numbers of the slides that are grouped is shown on the slide located in the Filmstrip
- You can expand or collapse the grouped slide by right click on the group slide, select Group > Expand or Collapse
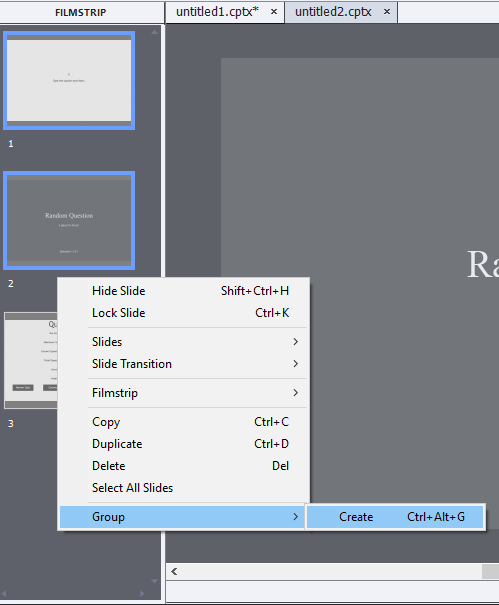
- You can ungroup the slide group by Right-click on the group slide, select Group > Remove
- You can name and color the group slide to identify and manage easily.
- Select the required group slide from the Filmstrip
- After selecting, go to the Property Inspector window and enter the name in the Title text box
- The name appears under the group slide
- You can change the color for a group slide from Property Inspector, select the required color from color palette
- Now the slides under the group the slide will follow the chosen color
Hide and Delete of the Project slides
How to hide a slide
When you are working on a project, and a slide is unwanted for the review, but the content of the slide is required for future purpose. You can hide a slide in the captivate project when it is played, but it is hidden in the Filmstrip.
Let’s see how to hide an individual slide in the Captivate project,
- To hide a slide, select the required slide
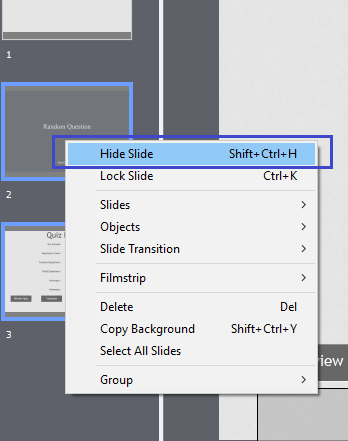
- Right-click on the slide, select Hide Slide
- The slide becomes transparent in the Filmstrip
- An Eye icon is displayed under the slide to show or hide the slide
While publishing the project, you can include or exclude the slide from the project.
- Select File, click Print
- Select Handouts from the Type dropdown
- From Handout Layout Options, select the Include hidden slide checkbox
- The slide is published along the other slides.
Bonus Tips
To remove a slide from the project permanently not hidden,
- To delete a slide, select the slide
- Right-click on the slide
- Select Delete from the menu
- Slide is removed from the project
Creation of Introductory Slide
The Introductory slide is the slide which gives the first impression to the audience. Keep the introductory slide attractive and attention-grabbing slide. It is better to use good audio, animation, effects, and captions. Let’s see some tips for creating an introductory slide,
You can add a welcome message for the audience or add some music to keep the introductory slide engaging. You can add sounds from the default gallery provided by Captivate tool. You can also record your voice for slide or use the default voice over provided in the Captivate tool.
- To add voice over to a slide, select Audio located at the top of workspace bar
- Select the Speech Management, then text to speech window appears
- Enter the text for the slide and select the default voice over
- After entering text, select Generate Audio
- Voice will be synchronized for the slide
Create some good effects for the text or clipart that appears on the slide by selecting the required effect from Timing window. Create Animation for the text or clipart that appears on the slide by selecting the required effect from Timing window. You can also add different colors for the Text caption from the Property inspector.
Adding Skin to a slide
Adding skin enhances the project. Adobe Captivate comes with default set of skins. It includes border, playback controls, and table of contents. By using skin editor, you can create customized themes for the project.
Themes
Let’s see how to create a customized theme.
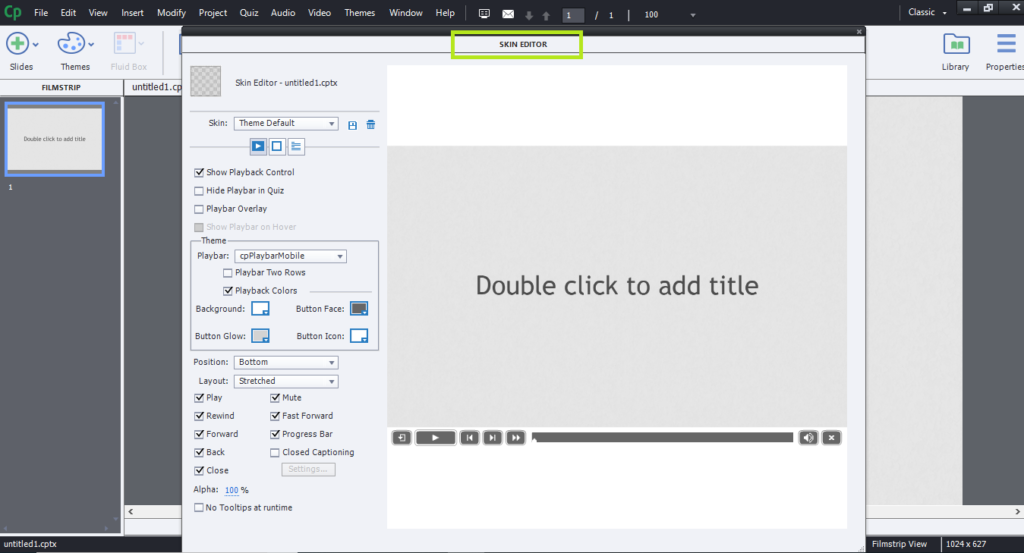
Themes section in skin editor comes with default settings that are currently applied for your project. It consists of three options such as Playbar, Playbar Two Rows, Playback Colors. Playbar theme can be changed through the playbar dropdown section. If you check the Playbar Two Rows check box, it displays the playback controls and progress bar in two separate rows. If you want to change the colors of playbar, check the Playbar Colors checkbox. It enables you to select the customized color for the background, button face, button glow, and button icon.
Playback controls
To open Playback controls, go to Project > Skin editor.
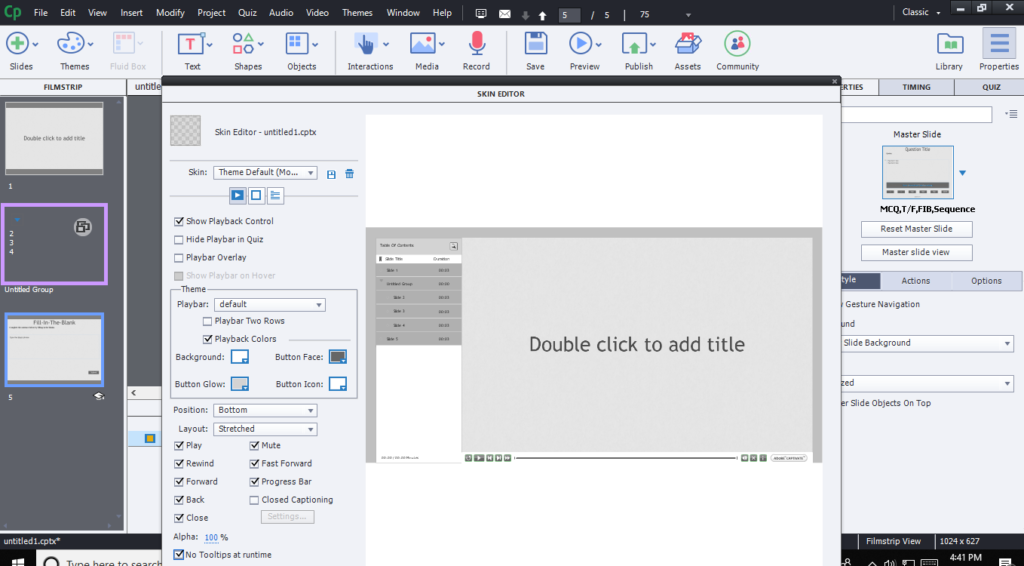
It consists of a playbar and progress bar that allows you to control the video when it is played. It consists of buttons that controls the movement of the video. The progress bar gives you the info of the current slide progress. In Skin Editor, under the Playback Controls, if Show Playback Control checkbox is checked then, playbar is displayed at the bottom of the video.
Next, Playbar Overlay checkbox allows you to place the playbar at the top or bottom of the video. In Position dropdown, you can select the position of playbar at any four sides of the video. In Layout dropdown, you can align the playback controls to left or right, you can also stretch them along the video.
Playbar consists of Play or Pause, Mute, Forward, Fast forward, Rewind, Back, Closed Captioning and Progress bar. These can be hidden or shown on the Playbar by checking the checkboxes for each under the Skin Editor dialog box.
Play or Pause is used to pause or resume of the video. Mute enables you to turn off the audio. Forward enables you to jump ahead in the video. Fast forward enables you to skip the slides. Rewind helps you to go back in the video. Back helps you to go back to the previous slide. Closed Captioning allows you to hide or show the closed captions. It is mentioned as CC in the Playbar.
Project Borders
Go to Project > Skin Editor > Project Borders
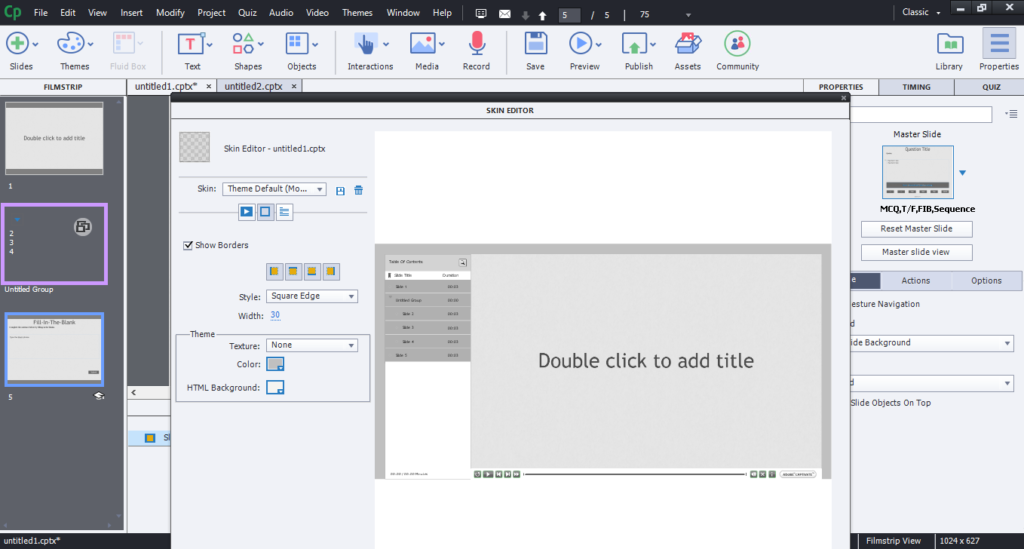
To enable/disable the borders for the video, click on the Show Borders.
To add borders to any side of the video, click the buttons to enable the border. You can create borders for the video in any combination.
To edit the width of the border, style, texture and size use the skin editor dialog box.
You can have the borders with round or sharp-edged by using Style.
To choose an image as a texture for the borders, click the Texture. If you select the texture, then colors applied are removed automatically. Select none from the texture list, if you want to apply color.
To change the color for the border, click on the color palette or use the eyedropper and select a required color.
To change thickness of the border, click on the Width.
To select a background color for your project, click the Background color.
Preview a Skin
After making the required changes to the slide such as color, borders, button colors, the position of play bars, and adding or removing the menus, you can preview it from skin editor dialog box. It displays the first slide of the project as preview and objects in the slide are not displayed in the preview.
Bonus Tips
Whenever you preview the skin, it may load slowly due to the extensive background image or any other criteria. To overcome this problem, insert a blank slide as the first slide and make the required changes to it. As the slide doesn’t have any objects, it may load fast. Later, you can hide or delete the slide after the changes are done.
Save a Skin
You can save a customized skin as a theme in the Adobe Captivate. This is added in the Skin menu in the Skin Editor. You can use it for the next project if required.
To save the skin, follow the below steps:
- Go to the Project menu, select the Skin Editor
- In the Skin Editor dialog box make the changes required for you
- Click on Save
- Enter the name needed for the skin in the Save As dialog box
- Click OK
The customized skin is now added to your list.
Securing and Changing the order of the Slides
If you secure or lock a slide, it is useful when you are sending the draft version for review and also helps in maintaining the privacy.
- To lock a slide,
- Go to Adobe Captivate project
- Select the slide required to lock
- Right-click on the slide, select Lock Slide
Bonus Tips
To select all the slides at a time, go to Edit menu and click on Select All. Another way is to hold Ctrl or Shift key and select the slides.
To change the order of the slides,
- Select the required slide or slides from the Filmstrip
- Drag the slides to required position in filmstrip