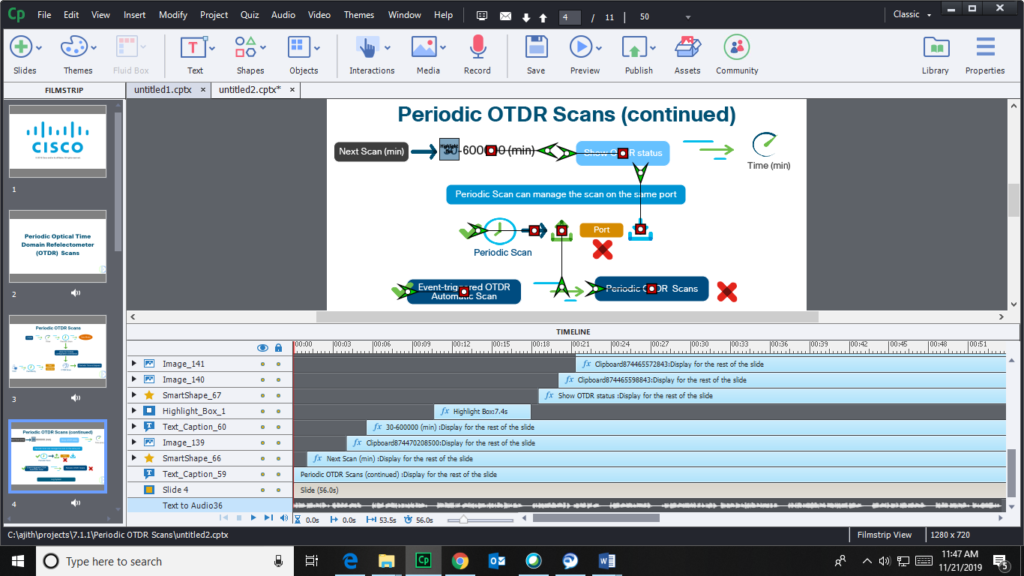
Timeline is located at the bottom of the Adobe Captivate project. To hide or unhide the Timeline, go to Window and click on the Timeline. You can also dock and undock the timeline by giving double click on the Timeline tab.

Timeline is a group of objects that can be adjusted with respect to time and you can also change the order of the objects. The main use of the timeline is to synchronize the audio and objects as you required. It plays a key role in editing the objects time and position of the slide.

It consists of the Header and the Playhead as shown in the above image. Timeline consists of the left and right pane. Right pane shows the visual representation of the objects. The right pane also consists of the Elapsed time, Selected Start Time, Selected Duration, Slide Duration, and Change Zoom icons located at the bottom.
The left pane shows the objects names and allows you to lock or hide the objects using the Lock and Hide icons which are located at the top of the pane. The left pane also consists of the Play, Pause, Stop, Mute Audio, and Playhead Forward buttons located at the bottom.
Let’s see how to work with the Timeline.
For example, let us consider the above image.
It shows different object layers such as Text to Audio, Text Caption, SmartShape, Image, and Highlight Box. You can see the object layers start time and end time in the header in seconds. You can use the Playhead to play the slide from the required time (sec).
To change the objects, start time or end time in the slide, select the object layer and place the cursor at the edge of the object layer which shows handle for dragging the object layer to the required time.
To change the order of the object layers, select the required object layer from the right pane and drag it to upside or downside in the timeline to adjust it to required position.
If your slide has so many objects and you want to hide any object, then click on the yellow dot which is associated to the object layer under the Eye icon, then shows a red dot which doesn’t show the object and to unhide it, then click on the red dot.
To lock the object, click on the yellow dot associated with the required object under Lock icon, then you can see a Lock icon with bracket around it. If you want to unlock the object, then click on the Lock icon with bracket.
You can use the Play button under left pane at any time to play the slide and use the Stop button to move the Playhead to the beginning.
You can mute the audio of the slide by clicking on the Mute Audio button. You can move the Playhead to the beginning or ending of the timeline, using the Forward buttons. You can preview the slide from a specific point of time using the Playhead.
Elapsed Time icon under the right pane of the timeline shows the playhead location in the timeline in seconds. Selected Start Time shows the selected object start time. Selected Duration shows the selected object total duration in the slide.
Slide Duration shows the total duration of the slide. You can zoom in or zoom out the object layers view in the timeline using the Change Zoom bar.
You can also delete, hide, and lock the object from the timeline. Select the required object and right click on the object and select the Hide, Delete, and Lock as required.
These are the features of the timeline where you can customize the slide.