What is Software Simulation in Adobe Captivate?
Software simulation is a feature used for recording the application screen or desktop screen which adds as slides and objects in the Captivate Project. These are edited and arranged as required and published as HTML or SWF files.
Software Simulation Recording
Let’s see how to record software simulation using the Adobe Captivate.

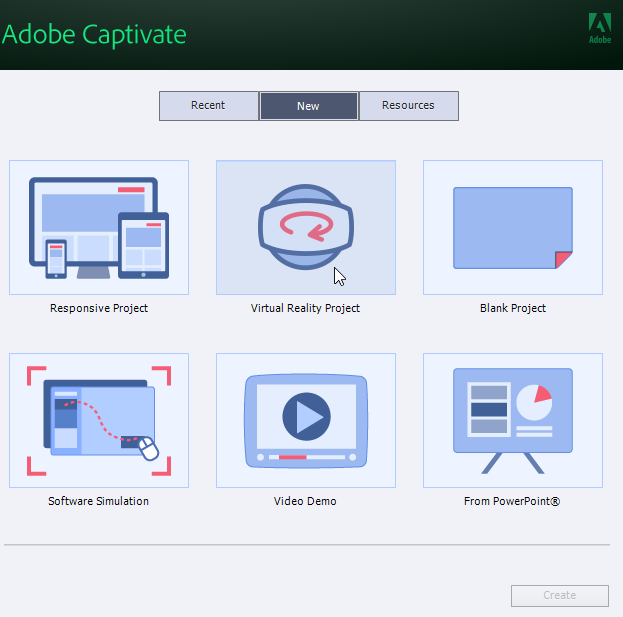
Launch the Adobe Captivate application on your PC. You can find a Software Simulation in the home page. Select the Software Simulation from home menu and click on the Create.

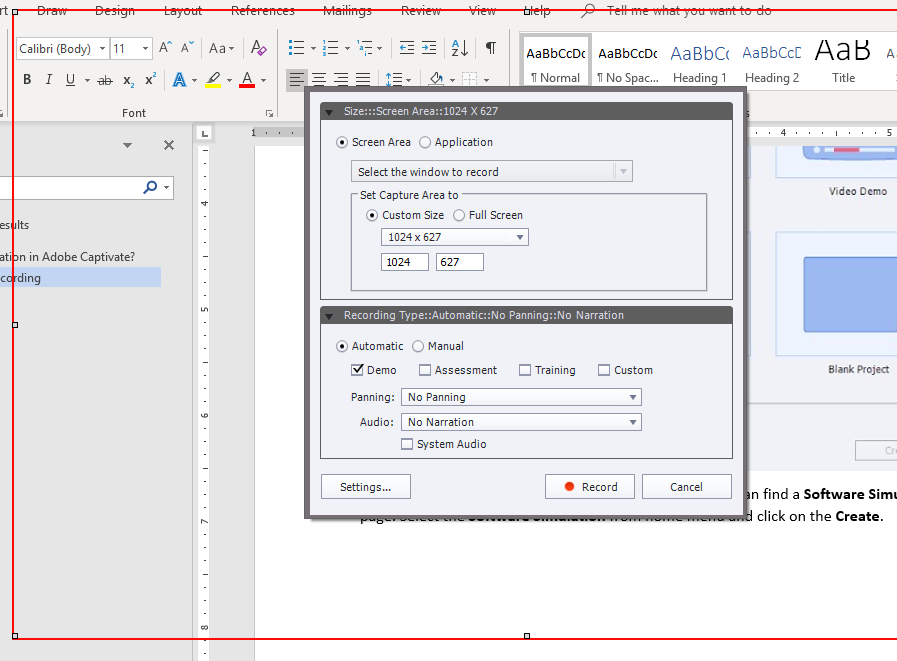
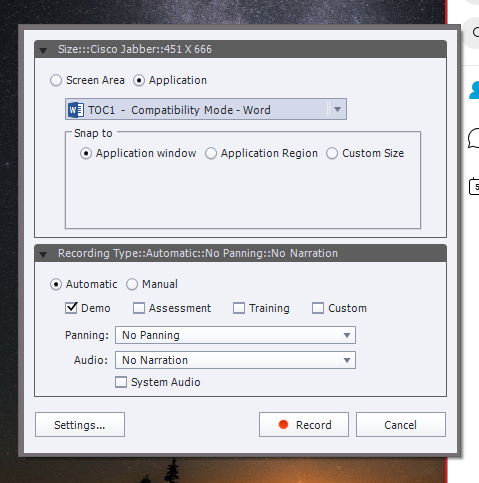
Now, it opens a window which has two sections and from the first section, choose the Screen Area button and from Select the window to record dropdown, choose the required window for recording the actions. Choose the Custom Size for resizing the screen area which appears in red border line or choose Full Screen which records the entire desktop screen. To record the simulation for the application, then choose the Application. Select the required application from the dropdown to record.

Using the Snap to section, choose the required option to record the application window or application region or custom size of the application. Choose any one option as you required.
After selecting Screen Area or Application, choose Automatic or Manual for recording type from second section. In Automatic mode, you can select the demo, Assessment, Training, and Custom as you required.
Demo is used for demonstrating any particular feature from the application or any procedure. It is produced as video, but user interaction is not possible. For example, if you bought any product, then you can find a demo of the product which shows how to use it. You can create such kind of demo in a form of a video.
Assessment is used for assessing the candidate skills by giving some click boxes and text entry boxes for answering from the users. It is used for testing the audience which is intractable.
Training is used for training the end users by giving learning content as a demonstration through click boxes, text boxes, and failure captions for learning.
Custom is used when you don’t want any default objects to be added and create the demonstration as required.
You can select all the features and use the combination of all of them as you required which generates separate tabs for each option in captivate project.
In the Panning field, select as required. If you enable panning, it captures the moments of cursor on the window.
In the Audio field, if you have any audio plugin, then choose the audio input. Check or uncheck the System Audio as you required which enables to record system audio while recording or vice versa.
If you want to make any changes to the default settings of captivate, then click on the Settings and make changes to the settings as required. Click on the Record. If you have chosen manual recording, then click on the Print Screen to take screenshots.
Click End button to stop and save the recording.
Now, the recording is added as slides to your project and shows different tabs for Demo, Training, Assessment, and Custom. To preview the simulation, click on the Preview from toolbar and select Project. You can add text captions, roll over images, and Interactions as you required. You can resize the project.
Note: This recording doesn’t support 4k and it should be done through 1080p record only.
You can add additional slides to the project. Click on Slides and select Software Simulation. In the dialog box, select the slide after which you want to record the simulation. Click OK. To start recording, click on the Record. Newly recorded slides are added to the project after the slide you have selected.
After everything is done as per your requirements then click on the Publish from toolbar and select Publish to Computer. Select HTML5 and SWF from Publish as field. Browse the computer to select the location of file to store. Choose Output format as SWF. Click Publish. This render and adds the simulation file to selected location.
Create Responsive Simulation
To create responsive simulation, go to the File menu and select New > Responsive Project.
Now follow the same process as mentioned above to record simulation. After adding simulation, you can also re scale the size of the simulation using Rescale Project from Modify menu which is located n the toolbar.
Bonus Tips for Simulation Recording
When you are selecting either Screen Area or Application, ensure that you record it in automatic mode because when you record automatic mode.
You cannot take the screenshot every time so you can use automatic mode to capture your moments automatically and if you want to capture any extra moment, press Print SCR to take the screenshot.
Every time you capture a moment, you can hear a shutter sound which indicates that moment is captured. Move the cursor actions slowly while recording the browser because it may not capture popup in case it is fast.