Python Sending Emails
Python contains a module named smtplib that is used to send emails. SMTP stands for Simple Mail Transfer Protocol.
The term protocol is used by some object oriented programming languages to describe transfer of data between several unrelated devices under the same network.
Python is a very powerful programming language and it does not require extra dependencies to send emails.
To send emails, you will need to understand some terms related to the SMTP module. Gmail is an SMTP server provided by Google that provides free service to send emails. For this to work, you must have a gmail account.
Example

Above, after importing the smtplib library, we create a variable named “server” that will be using the library’s instance to establish an SMTP connection. The parameters passed above are in the following syntax-
Syntax :
smtplib.SMTP(host = “ “, port = 0, local_hostname = None)
All of the parameters have a default value but what can be the appropriate values to fill in the parameters. Here is the information you need to know about the parameters of the SMTP function:
- host: This is the address of the host using the SMTP server. In this case, we use gmail’s host address.
- port: The port is an identifier that identifies where our host is accessible, and this argument is necessary to pass if you have passed the host value. For gmail, the value of it can be either 465 for SSL or 587 for TSL.
- local_hostname: If the SMTP server is running on your local machine, then you would have to specify it in here. You can either enter the localhost address, i.e., 127.0.0.1 or you can simply enter localhost as the value of the local_hostname.
Now enough learning, let us get practical and write the whole code to send the email.
If you want to receive the email, you need to turn off the setting on the sender’s mail address by going to this url address. You will also have to disable 2-factor authorization (if enabled) on your gmail account. After completing these steps, you are ready to send emails.
Example
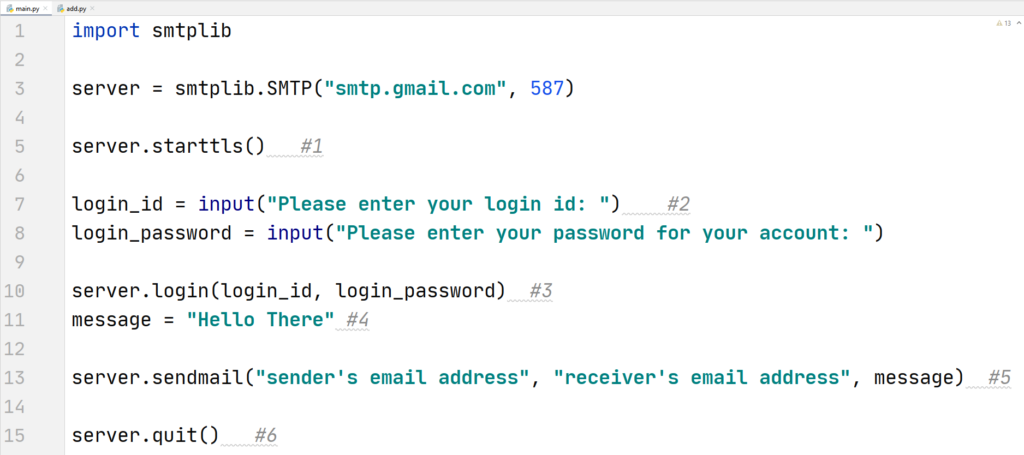
Let us understand the code above step by step –
- We start the transport layer security by using the starttls() function.
- We will need to login into our gmail account, so we first ask the user to enter the login details.
- The SMTP has an object function login() to login into the host account. Now you need to pass appropriate values for your gmail account, the compiler will give you an authentication failed error if the login information passed is incorrect.
- We write the message that we want to send in our mail.
- Now we use the sendmail() function from the “server” object. This function takes three arguments, sender’s mail address, receiver’s mail address, and the message that we want to send. We pass the appropriate information here.
This email session has to be terminated, so we use the quit() function.
Sending Multiple Emails to Different Accounts
The for loop can be used to send different emails to multiple accounts. For example, you can have a list of mails, and by running a for loop on that list of email addresses, you can send multiple mails like this-
Example
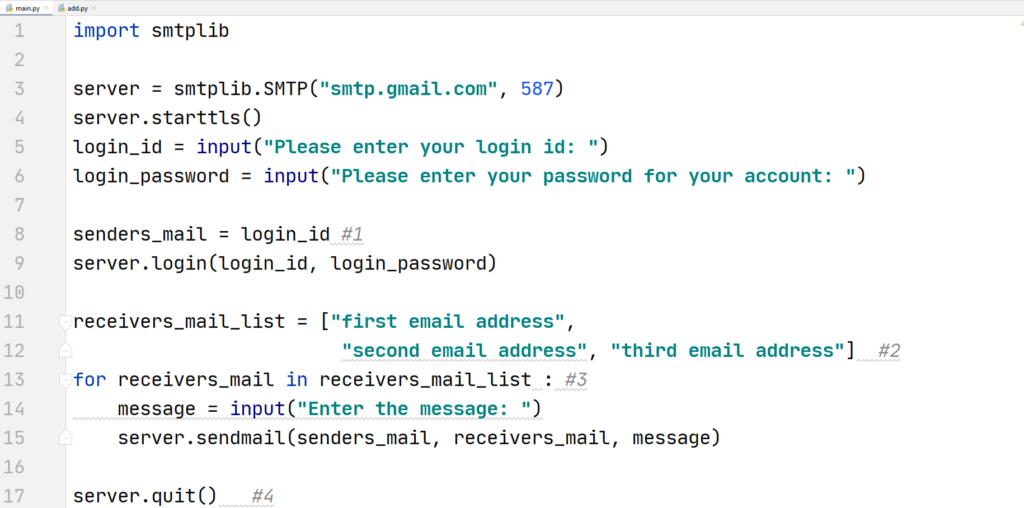
Some important to keep in mind(Tips)
- For now, our login_id is the same as our sender’s mail address, so we initialize the value of login id to the senders_mail variable.
- We have a list of mail addresses where we want to send the mails, please keep in mind, the actual values in the list should be actual and valid gmail addresses.
- A for loop is created to run through our list of emails.
- We placed our quit() function outside of the for loop because we only want to quit the session once all of the mails are sent.
Using this method our emails most probable will not get detected as spams. But what if we want to send attachments in your mail with Python, let us see how you can do that.
Sending Attachments
So far we have only sent mails that do not have any attachments and a subject. You will see how to use a method to use Python to send emails with attachments. A good thing about this method is that in most of the cases, your mail would not get sent into spam.
You will have to import some modules in order to perform this task easily. To make things even easier, you will not have to install some external modules, Python has these modules already built in into it.
Example
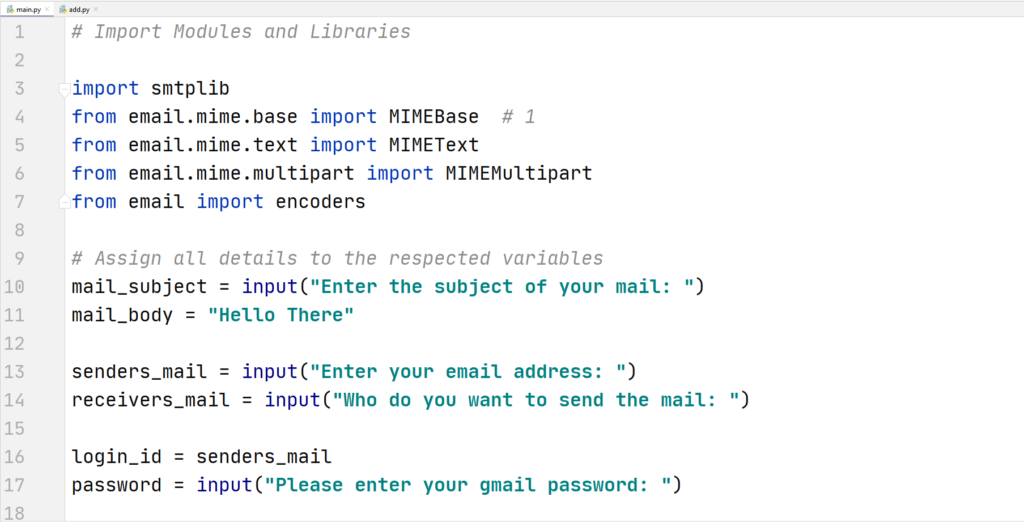
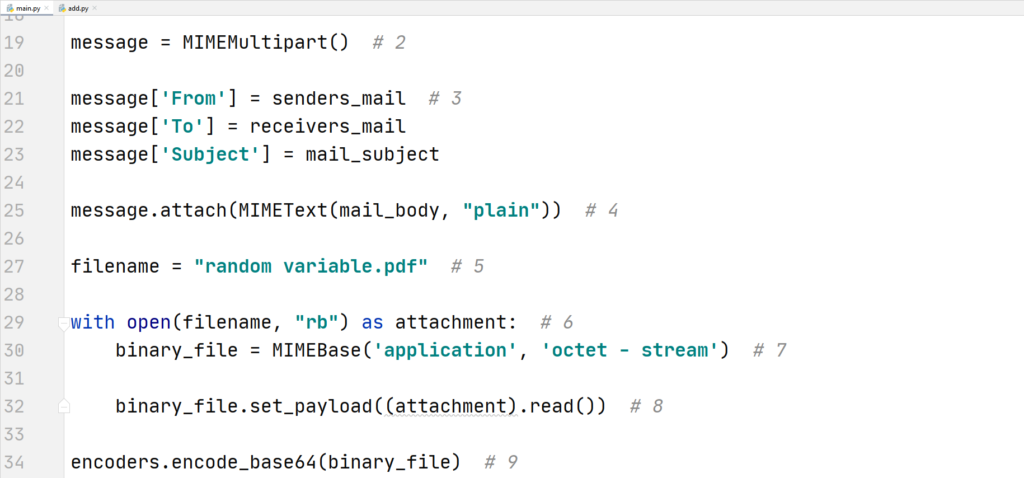
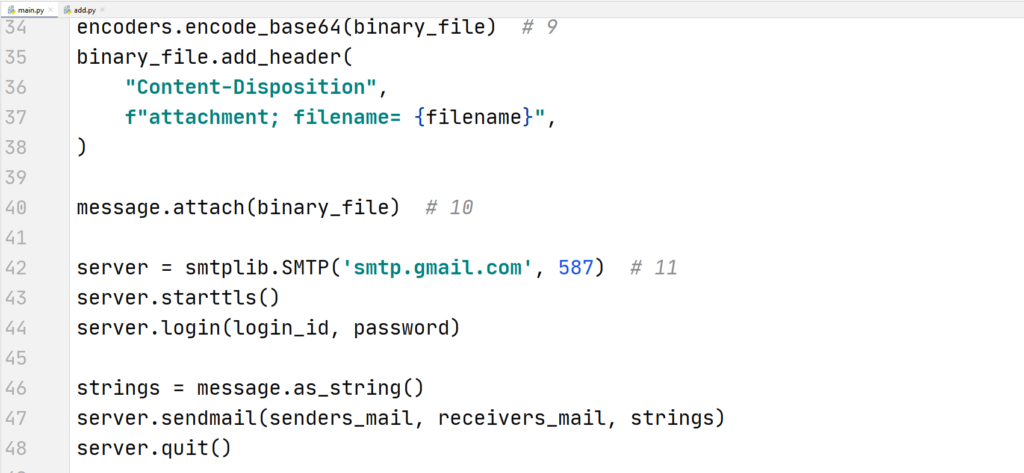
Let’s understand step by step how the code above is working:
- The email module in Python is a library created especially for handling emails. MIME stands for Multipurpose Internet Mail Extensions and it is a standard that converts the email format to support text in character sets like attachments such as audio, documents, etc.
The MIMEBase is the base class that is required for the conversion. MIMEMultipart is used to create different parts of a multipart email. And, MIMEText is used here to create MIME objects of type text.
Finally, we import encoders that will be used to encode our attachments through the mail servers. This is necessary for image and text data type. - Here we create an instance of the object MIMEMultipart().
- Now using the instance of the object message, we assign values to the instance’s keys that are “From”, “To”, and “Subject”.
- We use the MIMEText() to attach our body of the mail into the email.
- You have to choose a document file for this task, now, make sure the file that you are selecting should be in the same directory as of the code.
- The with statement is required here for exception handling. We open our file as an attachment in the binary mode using the “rb” keyword.
- MIMEBase is used to convert the format of email to binary, the arguments “application” and “octet-stream” are used to indicate that the file contains binary data. We store it in the binary_file variable.
- A payload is a string or a binary object, and in our case the latter is true.
- Now using the base64 encoder our binary data is represented into ASCII text. This encoder can convert any type of binary data, for example, images to ASCII text.
- We add a header to our file. The filename contains key-value pairs of name and file type of our document that we are sending. Each key-value is assigned to the attachment and filename parameters of the add_header() function.
- Now we simply attach our binary file to the message instance.
- As discussed already, we set up the gmail server and all of the necessary login details. Now we are ready to send our email.
Sending emails is one of the many possibilities in Python. There are tons and tons of others, that is why remember to stay curious.