What is Interactive Video?
Interactive video is the video which has the interactive features where audience can interact with the video using the interactive tools and elements. This allows users to engage throughout the video and it is very useful for e-learning videos.
It is mostly used for training and evaluating the employees through interactive elements in the corporate industry. Interactive videos are used in education platform for children and it is accessible for older people also.
Adobe Captivate offers wide range of options to create an interactive video.
Interactive videos are created through HTML5 output. You can create an interactive video using –
- Slide video, and
- YouTube video
You can also create an interactive video through CPVC files by adding interactive elements and publishing it as HTML file.
Create an Interactive Video
Let’s see how to create an interactive video using the Adobe captivate.
To create interactive video using Slide Video, click on the File menu and select New Project > Blank Project or Responsive project.
You should add a video to the blank project or responsive project and make the video as interactive.
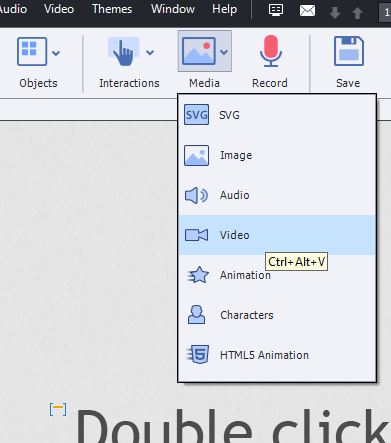
Go to Media, select Video > Slide Video.
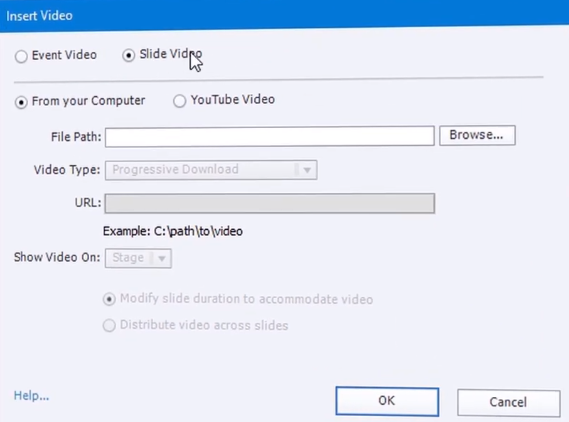
Click on the “From Your Computer“ and browse the PC to add the required Video. Choose Stage from “Show Video On“ field. Choose “Modify Slide Duration To Accommodate The Video” for adding the video to selected slide or choose the “Distribute Across Slides” to add the video to specified slides. Click OK to add the video.
You can also add the video by navigating to the Video from toolbar and select “Insert video“ > “Slide Video“. Follow above steps to add the required video.
Another option to create an Interactive video is from “Blank Project“.
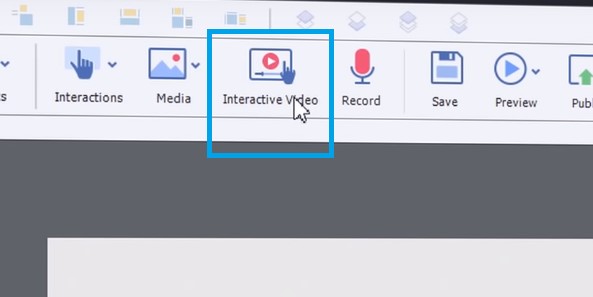
Click on the “Interactive Video“ from the toolbar and select “On Your Computer“ and browse the PC to add the required video.
Now, you should add the interactivity to the video using Bookmark and “Overlay Slide“ options.
Bookmark can be added at a particular location to jump to a point in a video.
“Overlay Slide“ can be used as to give an additional slide at a point of time to give additional information.
Let’s see how to add interactivity to the video.
For example, let me explain by adding the knowledge check slides as Overlay Slide. To add them as overlay slides, keep the knowledge check slides ready and add it to the project through File > New.
After adding the video to the project, adjust the video size to fit the slide by using alignment controls from Align toolbar or dragging the handles of the video to required position. Now, preview the video and understand the video to add the knowledge check slides as overlay slides at particular location.
Go to the Timeline and pause the playhead at a particular time to add an overlay slide.

You can find the overlay and bookmark object layers under the Timeline tab. Overlay and Bookmark buttons are added to the playhead as default. Overlay button can be seen as diamond shape in yellow color and Bookmark button can be seen as rectangular shape in yellow color.
Click on the diamond shape icon to insert an overlay slide and this will show all the available slides in the project. Select the required slide from the available slides and click Insert to add the required slide as an overlay slide. Continue the video and add required overlay slides at a particular time using Overlay button as required. All the overlay slides are added to the project in sequential order and an icon is added under the slide.
To check whether the overlay slide is shown or not, you can preview the video at a specified time. You can also edit the duration of the overlay slide, if needed.
Let’s add a bookmark to the video.
You can select the required point on the timeline using the playhead and click on the square shaped yellow button to add a bookmark. Once you click on it, then it will request you to enter a name. Now, enter the name and click on the Tick mark to add the bookmark to the video.
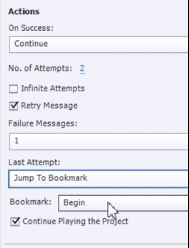
To add the bookmark as a button which redirects to the specified location, go to the Action tab from Property window and “On Success“ dropdown select the “Jump to Bookmark“. From Bookmark dropdown, select the bookmark you have added to the timeline. Now, if user clicks on the button it jumps to the specified location.
You can delete the bookmark from the timeline by clicking on the required bookmark and click on the Delete icon.
Click on the Preview from toolbar and select the Project to preview.
Click on the Publish from toolbar and browse the required location on desktop. Click Publish.
Let’s see how to make an YouTube video as an Interactive video.
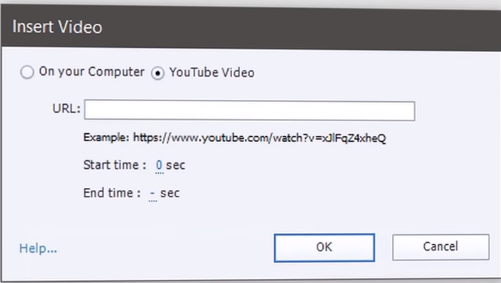
Project or “Interactive Project“ from File menu as mentioned above. Click on the “Insert video“, select “YouTube Video“, paste the link in the URL filed and click OK or click on the “Interactive Video“ from the toolbar, select the “YouTube Video“, paste the URL and click OK.
After this follow the above process of adding bookmark and overlay to the video to make it as an “Interactive Video“.
Click on the Preview from toolbar and select the Project to preview.
Click on the Publish from toolbar and browse the required location on desktop. Click Publish.