Create Rollover Caption
Rollover Caption provides an option to show or hide the text caption.
It provides a rectangular area where the user scrolls over it and text caption is shown. It provides extra information for users without using extra space of the slide.
You can edit the properties of the rollover caption such as size, color, and width as required.
Let’s see how to create Rollover Caption.
- To create rollover caption, Go to Objects menu and choose Rollover Caption.
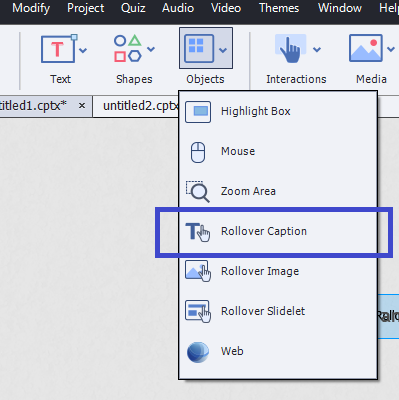
- Rollover area and Text Caption box are added to the slide.
- Click on the rollover area and resize it with handles given to required size by dragging it.
- You can select the required Fill and Stroke from the Property menu > Style.
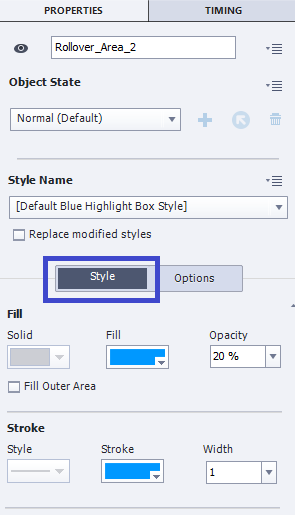
- You can also increase or decrease the Opacity and Width from the Property menu > Style
- To add audio to the rollover caption, go to the Property menu > Options
- Click on the Add Now, Objects Audio dialog box is opened.
- You can either Record or Import audio.
- To record the audio, click on the record symbol. You can stop and resume while recording using the Stop and Record
- To import, click on the Import. Browse the required file and select it.
- You can audio from the Library of Captivate.
- Click on the Save.
- Select the Text Caption box, enter the required text in the box.
- You can edit the properties of the text in the text caption through the Property
- You can change the color, font, size, alignment, ordered or unordered list, and text caption type.
- To resize the text caption, drag the handles of the text caption to required size.
Now, the required rollover caption is added to the slide. You can edit the rollover caption at any time in the project by navigating to the required slide.
Create Text Animation
Text Animation is like the text caption, but it is not static. You can add some animation effects to the text. This effect grabs the attention of the user. You can also edit the properties of text as the text caption. Let’s see how to create Text Animation.
- Go to Text menu and select the Text
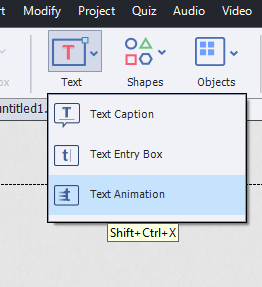
Text Animation Properties dialog box appears on the slide.
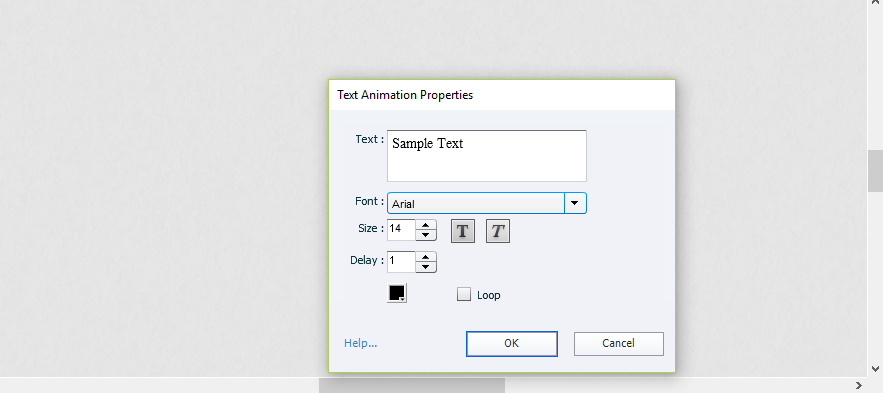
- You can add the text in the Text
- You can change the font and size of the text through Font and Size
- Using Delay option, you can delay the animation of text in seconds. Enter the required number of seconds to be delayed.
- You can change the color of the text through the color palette. Click on the color palette and select required color.
- You can provide continuous animation for the text. To provide continuous animation, Check the Loop check box.
- Click OK to save the changes.
Edit and Timing of the Text Animation
Now, we will learn how to edit, set the timing, and effect option.
You can edit the text animation properties at any point of time in the project. To change the properties of the text animation, double click on the required text animation.
To change the effects of the text in the text animation, click on the Text Animation. Go to the Property menu.
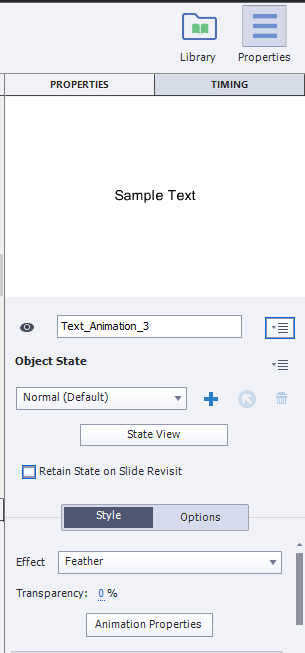
- You can change the name of text animation through property menu.
- You can add different effects to the text animation through Style > Effect
- You can change the transparency of the Text Animation through Transparency by increasing or decreasing the percentage.
- Click on the State View to make the changes only for Text Animation.
Now, let’s see how to edit the Timing of the Text Animation.
- To change the timing, click on the Timing menu from Properties window
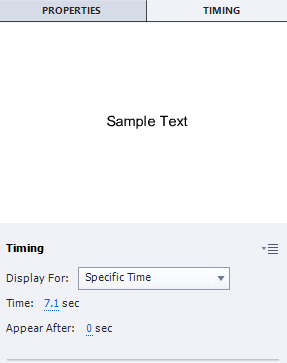
- Click on the Display For dropdown, select Specific Time for the time mentioned by you in the TIME and Appear After.
- Select Rest of the Slide from dropdown list to make the text animation appears for entire slide duration.
- Select Rest of the Project from dropdown list to make the text animation appears for the entire project duration.
- To add the effect for the Text Animation, go to the Properties menu located at the top tight corner and scroll down to Effect section in Timing menu.
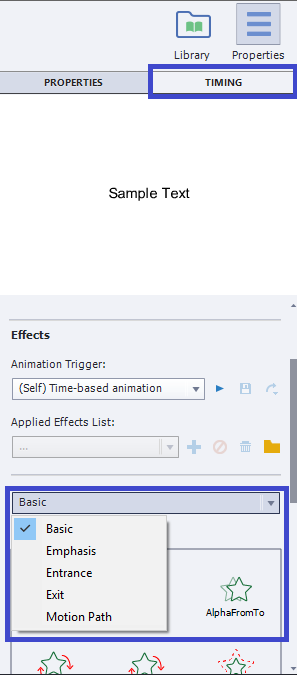
- Click on the Effects dropdown list, Select the required option from the Effects menu
- Then, select the required effect as required.
- You can also add the effect start time from the same timing menu.
- You can set the duration and end time for it.
Congratulations! You have mastered how to work with the Text Animation. It can be added and edited at any time in the project.
Keep Practicing it and you will eventually master all the steps.