Table is a collection of Rows & columns. It is essentially an intersection of horizontal and vertical lines.
The table is an important way to group related data in a web page.
There are 2 important ways to add a Table in your WordPress Post/page –
Using, HTML & CSS requires you to have a technical knowledge of HTML and CSS. HTML stands for Hyper Text markup Language to create web pages while CSS stands for Cascading Style Sheets which add styles to the HTML Pages.
In this article, we will NOT be using HTML & CSS to create Tables, rather we will show you how you can easily create tables using a WordPress Plugin called ‘TablePress‘.
TablePress Plugin allows us to easily create a table by adding short-codes. TablePress is a free plugin used for creating & you can embed these tables to a post, page or text widgets.
Functionality of TablePress plugin
TablePress is one of the best plugins for creating tables in WordPress –
- You can change the style of the table by entering CSS command into the “custom CSS” text-area on the “Plugin Option” screen.
- You can also add certain features like sorting of the table by visitors, filter, search table, pagination, etc.
- You can export your table in a CSV, HTML, JSON files formats.
Steps Requirred
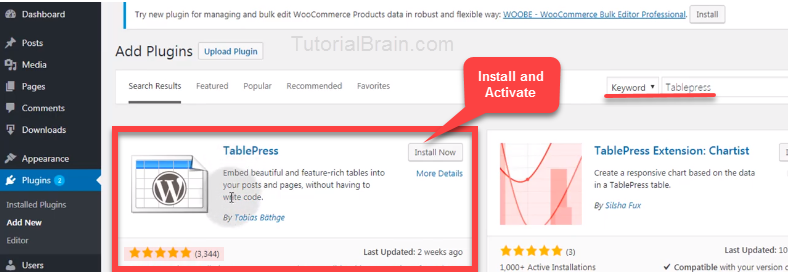
- Go to Dashboard > Plugins.
- In the keyword Area, type “Tablepress“.
- You will see the plugin with name ‘TablePress‘ by Tobias Bäthge. Currently at the time of writing this article, this plugin has more than 700,000 active installs and more than 3000 positive reviews.
- So, make sure that this plugin is compatible with your version of WordPress. If yes, then Click on install and activate.

Table Press is active now.
- Go to Tablepress plugin > Add new tables.

- Now, provide the table name, number of rows, number of columns. In this case, we gave the table name as – STUDENT MARKSHEET, Number of Rows as 5 & Number of columns as 5.
- Once you provide all the necessary details. Click on Add Table.

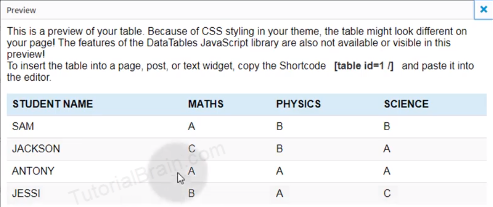
- Fill Table content > select option which you want > save changes.> preview.

Now, the table is created with the name as ‘STUDENT MARKSHEET‘. Let us see how you can use this table in your blog or post.
For adding Table to a page or blog.
- Go to post > add new > give the title.
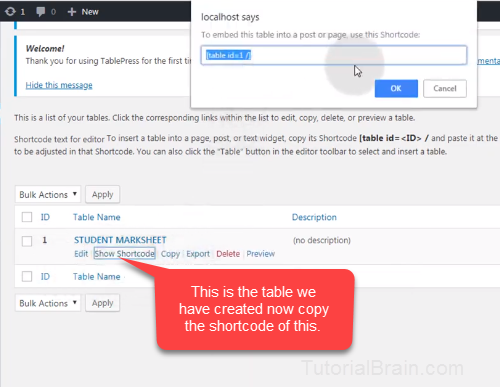
- Go back to TablePress. Select the particular table & click on show shortcode > copy the shortcode of the table you created.

- Paste the shortcode to post or page where you want to create that table. Once you save the Post/Page, then click on view post to see the table.

So, this is a simple way to create a Table in WordPress using the Tablepress plugin.
If you wish to create Tables using HTML, then learn our HTML Tables ,and to apply styles on the HTML Tables, you can use CSS Tables.